"Small Crimes" – Failure cover
EDIT: HOW THE HELL DID I POST THIS WITHOUT THE LINK TO THE SONG??
I love this song so I recorded a cover of it.
This was a quick project to keep me focused for a few nights. I didn’t have all of my equipment handy so had to improvise a bit.
Guitar – Ibanez RG into JCM 900 into Mesa 2×12 into Royer 121 in API 312
Bass – Some kinda Dean into a Tech21 Sans Amp RBI into API 312 that was then clipped to HELL
Drums – Programmed using Superior Drummer then replaced using samples in Trigger
Vocals – First two verses are SM7 into a modded GAP Pre 73, the rest was SM7 into API 312
There is a thick layer of reverb on everything, room effects, lots of tape saturation and compression, and all kinds of other tricks to get it sounding the way it does. I also set the BPM to match the original and didn’t change anything which begs the question, “why listen to this when you could listen to the superior original?”
Almost all Nebula. Total sonic abuse. It took a lot of work to get it sounding like this. I kept comparing it to the original and while it still doesn’t sound nearly as good, I think I got the spirit of Failure’s version. Getting the vocals right took a lot of experimentation. In the end, it was a combination of room effect, reverb, EQ, and proper panning — whenever you hear a doubled voice, it’s only panned about 25%, single voices in the center. Four distorted guitars, two clean guitars, one bass, and the weird clean bass is two that are panned hard. I think the sampled/programmed drums hurt it a bit but for what it is, I’m pretty stoked. Enjoy.
Gear and frustration
More new stuff. Working backwards…
Today, new monitors: Adam A7X. I had done a ton of research on monitors but what I saw was review after glowing review for these so I went for it. It was time, the Event Project 6s were kind of outclassed by everything else. Time for big boy monitors! So there we are. I realized that the TRS cables I was using were no-name cheap crap so I replaced them with nice new Mogami TRS-to-Mogami. I shouldn’t be so excited about cables.
Slate Trigger Platinum. I was using my buddy Joe’s copy of Drumagog for years and it just couldn’t keep up with metal. I also had to get an iLok, which I guess is another “big boy” studio purchase.
Saturday night, I sprung for Nebula Server. Not worth explaining but it’s new, it helps me use my RAM more effeciently, and I’m happy about that.
Last weekend, I picked up an Ashly SC-50 compressor. It’s from the 80s, I believe, and is somewhat well regarded in the engineering world… by most, at least. Some people claim it’s killer for guitars and bass, others say just rock solos, others say it’s trash. Me? Not sure yet, haven’t had a chance to play with it. The price was right though so I went for it.
That same weekend I also got a Tech 21 Sans Amp RBI. This is the expanded rack version of their bass preamp pedal. The usefulness of this device was proved on more than one occasion, both live and studio, and I needed a way to record consistently usable, if not good, bass. Here it is. I ended up getting the most insane deal on it, something like 60% off, so I just couldn’t pass it up. The day after it arrived, Ashencult returned to do bass and I managed to get what I thought was a fantastic sound out of it through my VP26 (AKA API 312).
A few days before that I made a huge order of cables from Redco. I’m on this quest to replace all of my crappy cables with cables of professional quality… If everything else is going to be pro, the cables need to pro, too.
So where does the frustration set in? Technology sucks. I spent HOURS fighting with my computer. First it was getting a Nebula update in. I deliberately don’t update Nebula often for fear of something like the inability to open any of my projects because of some weird random change. And you know what? I was unable to open any of my projects because of some weird random change. I had to uninstall and reinstall a bunch of times. Then I decided I wanted to install Nebula Server, which required more uninstalls and reinstalls, a bunch of recompiling of the jBridge plugin, and… hours later, I was up and running. The night was then spent running Unrest tracks through stages of tape and analog saturation. I was in bed by about 4am.
Today, after picking up the new monitors and Trigger, I had a hell of a time getting that software going. Long story short, there appears to be something wrong with some of the samples I made. Certain hits are late. At first I thought it was a latency issue — I thought Cubase (stuck using it for this project since that’s where it started) wasn’t adjusting it correctly — but that’s not it. Only some hits are late and some patches are better than other. The problem, it seems, is the amount of empty space before the drum hits. I kind of assumed that the software would be smart enough to adjust for that… I mean, there’s no way to ensure that the attack of each individual sample is going to be identical so shouldn’t it align the playback with the signal being passed through it? I’m going to find out. It’s frustrating.
Right this second, I’m still fighting with the computer. A fantastic-sounding plugin called VTM-M2 (tape compression, more or less) has some nasty issue with my system where it just eats up ASIO bandwidth. Why? No idea. Developers don’t know either. How nice. I wish it didn’t sound so good.
I accomplished less this weekend than I hoped. The goal was a finished, listenable mix of the entire Unrest album. The result was a listenable mix of three songs, the last of which is exporting now then I’m going the hell to bed. Had these various software issues not popped up, I’d have been done this morning. I think Cubase has a lot to do with it… I’m looking forward to finishing these last few projects and moving to Reaper, once and for all.
Enough whining. This is almost done, I’m almost asleep.
Nebula Setup and Basic Use
Consider checking the follow-up post, written 11/30/12.
I love Nebula. It has changed everything about my recordings by giving me access to tools that I would in all likelihood never have otherwise. It also required me to get a whole new computer, changed my workflow in a way that might not be considered beneficial, and caused hours of aggravation learning its ins and outs… and I’m still pretty new at it.
I’m not going to explain what it is or why it rules cause you can do that very easily yourself. Go to http://www.acustica-audio.com and read. The purpose of this post is to help those who are new to Nebula get started as quickly as possible. The installation procedure is kind of weird, registration is weird, tweaking is weird, usage is weird. But the results make everything worth it.
So first, some basics.
You should make sure to understand all of these before moving on.
Nebula is the platform in which your libraries are loaded. By itself, it doesn’t do anything. Think of it as a container and the libraries go inside of it to make it do something.
The default location is c:\nebulatemprepository on Windows. I believe that Mac creates a folder of that same name either right in the Applications folder or in your home directory. Someone will have to check on that for me.
The free version of Nebula 3 is not as powerful as Nebula 3 Pro. Just buy Pro in the beginning and save yourself some trouble.
Some libraries will not work with the free version. Buy Pro in the beginning and save yourself some trouble.
ALWAYS USE THE REVERB VERSION unless you want to track with effects and latency is an issue. Really. Always. For everything. Stupid misnomer.
Installation
-
Download the version that matches your DAW software. 32-bit Cubase, 32-bit Nebula. If you’re running 32-bit software in a 64-bit operating system, invest in a VST Bridge (I use jBridge) so you can leverage more than 4GB of RAM.
-
Install Nebula. Accept all defaults.
-
Insert the Reverb version of Nebula on a track. The big difference between the standard and reverb versions is that reverb allows for longer tails and has greater latency. The standard version uses a shockingly higher amount of CPU. Use reverb. Always.
-
After you run it for the first time, it creates a .SER file in your nebulatemprepository file. Get this and email it to Giancarlo to register your copy. Do yourself another favor here and immediately post to the message board or PM him to give him a heads up that a registration is waiting in queue. This will probably speed up the process.
-
He will email you an EXE file. Run this and it inserts a few files into your folder that tell the application that you registered.
First Run
Once again, always start by using the Reverb version of the plugin.
Start by clicking on the word “Init” to bring up the libraries menu. Pick an EQ. The word “Init” changes to whatever patch you selected. Directly below that is a description if one exists. Directly below that it says something like this:
FRT: 96000 Hz -> 48000 Hz
The first number is the frequency at which the patch was sampled, the second number should be the frequency at which you are operating. The arrow in the middle should be solid, not flashing. If this is all the case, than all is well. In all likelihood, the two numbers will be the same and the arrow will be flashing, which means that it is not changing the sample rate correctly and will therefore not sound right. Click the MAST button at the bottom of the pseudo-LCD and change the RATE CNV to something like 7000. Hit the SAVE button (top right on MAST) then go back to PROG (your program controls) and then RELOAD (top right again.) The two numbers should be the same. Make sure to check this, very important!
Next, actually using it. The key to getting the most out of Nebula is gain staging. We kind of get spoiled in the digital world because clipping doesn’t occur within our DAW, so a single channel can hit +7 or greater and it really doesn’t matter as long as your output channel doesn’t clip. Because Nebula libraries are essentially clones of hardware devices, they do clip, so you need to ensure that you never go above 0db. Not ever. With some libraries, clipping will result in a really BRUTAL digital beep that can hurt your speakers and ears.
From the PROG page, you can tell the input level by looking at the INPUT L value. The magic number is -18 DB. Try to keep an average gain around there with peaks between -12 and -6. If it’s too low, use the INPUT nob. Too loud, use OUTPUT. I use the Sonalksis FreeG plugin if I want better gain staging control, one before and one after Nebula.
Something to watch out for is the confusing NORMAL vs ECONO thing. On the PROG page is a button that says ECONO when everything is working normally. If you click it, it changes to NORMAL and has a flashing dot. If you see this, you are operating in ECONO mode, meaning you are not operating the way the patch was intended. Some libraries mistakenly have ECONO mode enabled by default (cough 165a cough) and you might not notice. The effects of this differ from program to program but run in NORMAL mode by making sure it always says ECONO.
With that all said, the rest is rather self-explanatory. EQs are typically one band per instance of the plugin. This is because of the greater resources that are needed for multiple bands within a single patch. Need another band? Add another instance of Nebula. There are some libraries with multi-band EQ — Fate EQ and Mammoth EQ both have some. Fate’s Kick EQ in particular is killer! I’d say that in terms of worth, Nebula’s biggest assets for me are consoles and then EQ. The consoles alone are worth the entry price.
Don’t expect to use a lot of these plugins while tracking or editing. Get in the habit of applying settings, bouncing files, and importing with the effect burned to the track. Specifically console inputs on your channels and tape saturation.
My Favorite Libraries and Some Notes
Buy these.
COMPRESSORS: Fate Compressor and Snap Compressor (this one ESPECIALLY! SSL buss comp, sound better than Waves and The Glue) from Analog in the Box, Rhythm in Mind’s 165a.
EQ: AlexB’s CLeQ and MLeQ are my go-to, Analog in the Box’s Fate and Mammoth EQ are both fantastic as well.
CONSOLE: AlexB’s CLC, MLC, MWC, and MBC are all amazing, find one that works for you. CLC is a good place to start, especially if you’re doing rock.
TAPE: CDsoundmaster.com’s R2R and Tape Booster+ are absolutely essential. I also suggest their VTM-M2 VST plugin, which is probably my choice for favorite plugin ever.
REVERB and DELAY: I’ve never been a big reverb guy though this is an area that’s supposedly one of Nebula’s greatest strengths. I use one that has a name I just never remember… It’s a Plate Reverb. VXNT-something-or-other. I also just a minute ago discovered this, which is likely to get a TON of use by me. You’ll see one particularly enthused comment on that page… 😉
That will set you back a couple hundred bucks and arm you with practically everything you could ask for. I find myself using a few other compressors cause Nebula can be a little weird with fast transients but everything else is unreal.
The recommended usage of consoles and tape saturation looks like this:
CONSOLE MIC INPUT
R2R (depends on the source for me – almost always for drums, usually for guitars, sometimes for bass)
TB+ (again, depends on the source)
VTM-M2 (always)
CONSOLE LINE INPUT
I’ll very often just do VTM-M2 and then console mic input.
Buss groups have the appropriate buss group console program. Master always has a console master buss program. While some of these might be subtle by themselves, they make a huge difference when put together.
That’s it for now. If you see mistakes, please correct me. This will hopefully get you going.
API am so excited. (See what I did there?)
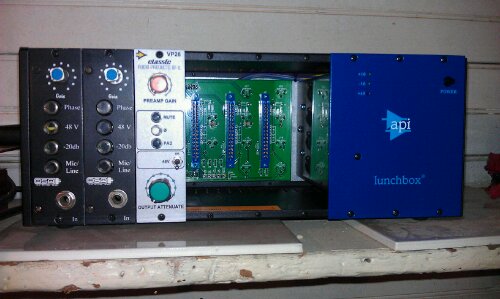
Thank you, income tax return. My goal for the next few months is to get enough outboard preamps that I can get rid of my aged Soundtracs PC MIDI 16. A big part of that is (well, was) having a few channels of API and now that has been accomplished. Pictured above is the API-6b 500 lunchbox with three channels of preamps. The first two on the left are genuine APIs racked by OSA before they did their own production line of 312 clones and the third is a Classic API VP-26, a 312 clone that by many reviews sounds better than a genuine channel. In my very brief tests, I’m liking the VP-26 better than the OSAs. A bit punchier, a bit more presence, though that isn’t to say that the OSAs are bad by any means — all sound awesome. I sampled my drums and played with Drumagog to replace hits in existing recordings since my next session is a few weeks away. I’m gonna buy a fourth channel sometime soon, probably another VP-26, so I can do snare and three toms simultaneously. I’m still not feeling APIs for kick, at least not for metal.
I also just ordered a Tech21 Sansamp RBI. It’s a bass preamp and DI that many engineers and bassists, including my dear friend Shawn Riley (of Rumpelstiltskin Grinder and Woe), absolutely swear by. I love bass. It’s so under-appreciated in metal and I’m glad to have another tool at my disposal to make it sound even more awesome.
Windows Server 2008 R2 Hyper-V Machines Won't Start After Failed SP1 Install
What a fun day! I awoke to a call that all of our server’s VMs were down and inaccessible. Remoted in to find that the VMMS service wouldn’t start.
The Hyper-V Virtual Machine Management service failed to start due to the following error:
The service did not respond to the start or control request in a timely fashion.
It took literally all day but I finally got it fixed and wanted to put notes in about how. I wasn’t able to get ANY help from this from Google but I have to assume others have had or will have this problem. This post will hopefully shed some light on the situation.
The troubleshooting was an epic process. At a number of different times, I thought I had it beat and realized I had made a lateral move. Rather than going through the whole story, the bottom line was that a failed installation of SP1 left our system in an inconsistent state. Some files reflected the RTM version, others reflected SP1. In our case, the first indication that something was wrong was an error when I launched vmms.exe from a command prompt, a long error (that I’m kicking myself now for not writing down!!!) referencing a procedure not found in VID.DLL. Comparing the dates of VMMS.EXE to VID.DLL showed that the EXE was SP1, DLL was RTM. I copied the DLL from another working server, put it in place, but was greeted with what appeared to be a permissions error when opening the Hyper-V manager. I fixed the failed SP1 install by using the earlier post I made on the topic — the same exact update was preventing the install. Repairing SP1 did not fix it. I uninstalled and reinstalled the Hyper-V role, also didn’t fix it. At one point, it gave an error about WMI components, which I fixed by Googling something along the lines of “reinstall hyper-v wmi” though that didn’t fix it, either. After all that, I was able to get the list of machines to display within the Hyper-V Manager but they failed when I tried to start them, saying that “one of the hyper-v components is not running.” Google gave me nothing of use.
What did fix it? The Event Log for VMMS showed this error:
‘Virtualization Infrastructure’ driver required by the Virtual Machine Management service is not installed or is disabled. Check your settings or try reinstalling the Hyper-V role.
That error didn’t tell me anything. Since it spoke of a driver, I checked Device Manager and under System Devices, there was “Virtualization Infrastructure Driver” with a yellow exclamation point. Its properties indicated that Windows couldn’t verify the signature of a driver file. I went to the details tab and then looked at the files that comprised this driver: VID.DLL, which I knew about, and VID.SYS, contained in c:\windows\system32\drivers. VID.DLL showed an SP1 version but VID.SYS showed RTM. Copied the SP1 version from a working SP1 machine, backed up the RTM and replaced with the SP1, disabled the driver, enabled the driver, and everything was good! …With that driver, at least.
Hyper-V machines still wouldn’t start. They were all in a Saved State and I theorized that with all of my attempts to repair this, including a removal and reinstallation of the Hyper-V role, those Saved States would be no good. I deleted the Saved States using the link in Hyper-V Manager at the bottom right when a machine was selected, tried to start, and got a NEW error about the virtual network adapter! This is because of the removal/reinstallation of Hyper-V, for sure. Right-click on each VM and the network adapter read as “Configuration Error.” Changed to the new virtual network, started the VM, and everything started up normally. What a day.